What is the resistance of the magnetron in the microwave. Troubleshooting the High Voltage Microwave Transformer
Checking oven components
Warning
Disconnect the power cord from the oven every time before removing the cover. Start any work inside the furnace only after discharging the high voltage capacitor and disconnecting the wires from the primary winding high voltage transformer. When checking and adjusting the microwave unit of the oven, it should be loaded by inserting a bowl with 1 liter of water into the oven.
Furnace output test
1. Place a container with 200 ml of water (temperature 10...18 °C) on the turntable.
2. Set the oven to full output and turn it on for 5 minutes.
3. For a serviceable furnace, the water temperature after that should exceed 80 ° C.
To check the operation of the grill:
1. Place food suitable for grilling and turn on the grill for 5 minutes. 2. If the grill is working properly, then its surface should be red.
Magnetron
The resistance between the glow plugs must be less than 1 ohm. The leakage resistance of the glow-case must be "infinity" (the device is turned on at the limit x 1000). If the repair was associated with the dismantling or replacement of the magnetron, when reinstalling the magnetron in the furnace, pay attention Special attention for damage and correct installation of the insulating gasket.
High voltage capacitor
The leakage between the capacitor terminals and each terminal and the capacitor case is measured. In all cases, the multimeter should show infinity.
high voltage diode
Its resistance is measured in the forward and reverse directions. In this case, the multimeter turns on in the Kx1000 mode. When connecting the "+" output of the multimeter to the anode of the diode (measuring the resistance of the diode in the forward direction), the device should show the final resistance value. When connecting the "-" output of the multimeter to the anode of the diode (measuring the resistance of the diode in the opposite direction), the device should show infinity. Use a meter with a power supply of at least 9 V. An indirect sign indicating possible malfunction high voltage diode, is the heating of the high voltage capacitor. In this case, if the high voltage capacitor is good, replace the high voltage diode.
High voltage transformer
The traditional method of checking the health of a transformer is to measure the voltages on its windings. However, in the case of high-voltage microwave oven transformers, this approach is not applicable due to the presence of a dangerous voltage of about 2 kV on the secondary winding of the transformer. In this regard, all manufacturers of microwave ovens recommend checking the health of a high-voltage transformer by measuring the resistance of its windings. To measure the resistance of the windings, the transformer should be disconnected from all wires suitable for it and check the compliance of the resistance of its windings with the one given in the table separately for each type of furnace. In addition, you should check the insulation resistance between the transformer windings, as well as the insulation resistance between the transformer windings and the chassis with a megger (or a tester turned on to the x1000 resistance measurement limit).
Signs indicating a transformer failure are:
excessive heating of the transformer;
charring of the transformer coil;
the smell of burning from the high-voltage part of the furnace.
Often this condition can be caused by a high voltage diode or capacitor failure, or by a breakdown within the magnetron. Therefore, the replacement of the transformer is carried out only after checking all the high-voltage elements of the furnace. Another way to check the quality of a high voltage transformer is to measure the no-load current. In this case, the wires suitable for the filament and secondary windings are disconnected from the transformer, and an alternating current ammeter is connected in series with the primary winding. The ammeter is set to a measurement range of 1 A. After that, a rated supply voltage of 220 V, 50 Hz is applied to the primary winding of the transformer through the ammeter. In a serviceable transformer (without interlayer and interwinding short circuits), the no-load current of the primary winding should be in the range of 0.3 ... 0.5 A. An excess of no-load current of 1 ... 2 A indicates a transformer malfunction.
Fuse
The multimeter should show the fuse resistance close to zero. If the fuse is blown, check the primary, secondary and safety switches before replacing the fuse. If the fuse is blown due to a malfunctioning switch, replace the switch before installing a new fuse. Only install a fuse of the same type and rating as the blown fuse.
Heater
Before starting measurements, disconnect the wires from them, and also wait for the heater to cool down. The resistance of the heater should be different types furnaces 30...50 Ohm at a temperature of 20...30 °C. The leakage resistance from the heater terminals on the furnace chassis is measured with a special megohmmeter with an output voltage of 500 V and a resistance measurement limit of 100 MΩ. The leakage resistance must be at least 500kΩ.
Magnetron and grill thermostats
They should have a resistance of about zero at a temperature of 10...150 °C and an infinite resistance at a temperature of more than 120...150 °C. The temperature may be different for oven thermostats from different manufacturers. Transistors of the electronic control unit Two types of transistors are used in microwave ovens:
conventional p - p - p and p - p - p - transistors;
switching microassembly from p - p - p - or p - p - p - transistor.
The difference lies in the presence of two resistors in microassemblies - between the base and emitter of the transistor and between the base of the assembly transistor and its external output. The use of resistors in microassemblies allows you to directly connect them to the outputs of the control processor and thereby reduce the number of elements by printed circuit board control unit.
Comment
1. A microwave leakage test should be performed after any oven maintenance. 2. After disconnecting the wires from the elements, reinstall them correctly.
3. When disconnecting connectors or connectors, do not pull on the wires, but on the connectors.
Today in our house there are a variety of Appliances. Especially a lot of them in the kitchen, where they help to simplify the process of cooking or heating food. most popular kitchen appliances, which can be found in almost any home, is a microwave oven.
This device is a long-liver, unlike the same newfangled multicookers, and it has appeared in household use for quite a long time. But, like everything in our life, there are situations in which microwave ovens start to malfunction or do not perform their direct duties at all. In such a situation, it is necessary to find out the cause of the breakdown. A common failure is the failure of a high-voltage diode. What is this detail and how it can be checked, our article will tell.
Device device
Sooner or later, the day when it is not possible to heat food in the microwave will come in every home. Of course, this is unfortunate, but one cannot insure against certain breakdowns. In this case, the device will not always give a clear “distress signal” in the form of a jet of smoke and other visual effects. Otherwise, it is unlikely that you will be able to repair the damage yourself. You will have to contact a specialist, and this will cost a pretty penny.
If the device stopped working without "special effects", then there is a chance to fix it with your own hands. There are such malfunctions, the diagnosis of which and the elimination of the causes of the breakdown will be quite cheap. And you do not have to spend money on expensive repairs or the purchase of a new model. But for this you need to know the device of the microwave oven.
Despite the abundance of various models and manufacturers, the principle of operation of the microwave oven and its device remains unchanged. The device is assembled from the following components:
- high voltage power transformer;
- high voltage diode;
- high voltage capacitor;
- magnetron;
- fan for magnetron cooling;
- thermal fuse that protects the magnetron from overheating;
- network filter;
- an electric motor for rotating the cup with food placed on it;
- limit switches.

Inside view
The serviceability of all the above components of the device ensures uninterrupted operation of the device during the entire period of operation.
Causes of failure
Despite the strict fulfillment of operating conditions, microwave ovens break down and the most common causes of breakdown can be:
- blown high-voltage fuse;
- failure of the high-voltage capacitor;
- failure like this important detail like a high voltage rectifier diode.
All these three reasons, if desired, can be eliminated with your own hands by returning the microwave to working condition again. It is worth noting that the malfunction of the high-voltage diode is just the most common cause of failure of the microwave oven.
Important detail

high voltage diode
To understand how you can correct the situation if a high-voltage diode became the cause of the breakdown, you need to figure out what it is.
The high voltage diode has the form a large number connections that connect diodes in series with each other into one element. This includes conventional rectifier diodes. They are performed using the same technology and are part of a single building. The assembly process does not use capacitors and resistors that equalize the voltage.
As a result, this diode has a nonlinear volt-ampere characteristic. Therefore, its resistance depends on the applied voltage. Because of such design feature test this component microwave oven rather difficult.
Note! This element cannot be checked by a tester. Using a tester in this situation will not give an accurate result. The device will show neither reverse nor forward resistance. Here you can use, for example, a multimeter. Measure its resistance in the forward and reverse directions.
To do this, the multimeter should be switched to R x 1000 mode. Here, when the multimeter output “+” is connected to the anode on the diode, the resistance is measured in the forward direction. As a result, the device should show the final value for the resistance. If the connection goes to "-", then the measurement is carried out in the opposite direction. In this case, it should register infinity.
Ways to assess the state
As you can see, due to the specifics of the assembly, such a diode cannot be measured with a conventional tester. To check it, the element should be turned over in order to measure from two directions.
To check the diode for serviceability, you must do the following manipulations:
- disconnect the microwave from the mains;
- disconnect the diode from the electrical circuit;
- we connect the circuit element to the lighting network. To do this, you must use a low-power incandescent bulb of about 15 V with a network of 220 V.
Note! The incandescent bulb should burn at half its brightness and at the same time flicker clearly.

Diode test circuit
This circuit must be powered from a 220 V network.
There is also another way to check the diode for serviceability. An incandescent lamp is also used here and the verification principle is very similar:
- we connect the element under test to a lamp of 20 V;
- if the diodes are connected in one direction, then the bulb will burn at full heat (healthy element);
- then flip the diode.
A change in glow is an indicator that the element is “broken” and should be replaced.
In addition to the above verification options, there is another method to make sure that this

Checking the second way
microwave oven component. To do this, you need a charger from mobile device or tablet. Here, an additional chain will also be needed.
Note! Chargers for tablets and mobile phones have a voltage of 5 V.
In this situation, the verification involves the following manipulations:
- we take out the diode from the microwave power supply;
- connect the element to the circuit;
- when measuring, it is necessary to switch the circuit to 10 V.
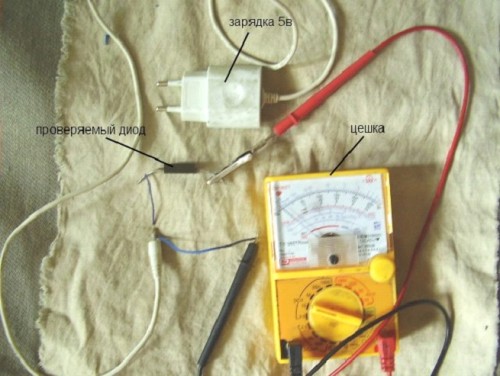
connected diode
If there is a working diode, the arrow of the device will show 0.25 V. At the same time, it will not show anything in the opposite direction. If the element is faulty and “broken”, then in any direction of measurement the device will demonstrate the absence of indicators.
If the diode is faulty, the bulb should burn evenly or not light up at all. There is a drop or complete absence of voltage. When identifying similar situation This electrical component must be replaced. After that, the microwave will work as before.
During the replacement, remember that the two terminals for the diode differ in the way they are connected, as well as in the purpose. A diode with a positive terminal (anode) ends with a ring for the bolt and is marked on its body. At the same time, the cathode (negative terminal) is connected to the capacitor and ends with a bracket. No other connection option is allowed in this scheme.
Conclusion
You can check the health of the high-voltage diode for the microwave oven yourself, which will help you repair the device on your own. To do this, you only need to use one of the above methods for assessing the performance of electrical network components.
Separately, it should be noted that if necessary equipment(ammeter or tseshki), the check will go quickly and show the real state of affairs. Depending on the light coming from the incandescent bulb, you can effectively determine whether the diode is good or broken. At the same time, during the replacement, you must adhere to correct connection anode and cathode. This is the only way you will be able to fix the breakdown yourself and restore the “life” of your microwave oven.
So you can fix the microwave on your own and avoid unnecessary spending on a new appliance or the services of a specialist repairman.
Today, few housewives can imagine a full-fledged kitchen without a microwave oven. The microwave oven has become an important, and sometimes an integral part of modern life: for those who do not have time to cook a full meal for themselves, but only have time to “warm up yesterday” or “have a bite to eat”, the microwave oven has become a real salvation - it heats up food in a matter of seconds, without any inconvenience, such as searching for dishes, shifting from one dish to another, etc.
Despite the health risks of microwave ovens, most users are still not ready to part with their favorite household appliance. In order to somehow protect yourself among all this diversity, you need to know how to check a microwave oven for harmful electromagnetic radiation.
So, let's begin.
Most often, a microwave oven has three modes: microwave, grill, and combined. Some models also have a convection mode, and if your model has this mode, then you need to check it too. To check the microwave mode, you will need microwave-safe utensils, about a glass of cold or room water. Fill your chosen container necessary quantity liquids, put in the microwave, and ... leave the door open. Yes, yes, open. Turn on the microwave oven and set the desired heating time - 2 minutes. Power must be selected as high as possible. Most often it is 800 watts.
The oven must not operate with the door open. After closing the door, the oven should start heating the product. As soon as the heating started, the microwave began to make a certain noise. It's quite normal. What is not normal is the vibration of the furnace body. Vibration may indicate an incorrectly installed housing cover, or incorrect operation of the internal fan built into the oven to cool it. That the first, that the second option are unacceptable, and require a quick repair or replacement of the furnace.
After the end of the set time, the oven should turn off automatically, notifying the user with a characteristic signal. As soon as the oven turns off, remove the container of water. Be careful! Because the container can be hot, like water.
Now you understand that the water in the container must definitely be hot, otherwise the microwave oven will not work correctly. If the water remains cold, chances are high that electromagnetic waves go to environment and negatively affect your health and the health of those around you. Even at low power, the water should be very hot within two minutes.
Next, check the grill mode. To do this, you need to remove absolutely everything from the microwave, leaving only the circle and the wheel for it. After removing all the contents of the microwave, close the door and turn on the mode. If the oven turns on, the light is on, and the circle rotates, and with all this, the noise emitted by the microwave is quieter than normal, then your oven is working properly. If working in the grill mode is accompanied by a peculiar smell reminiscent of machine oil, then do not be afraid - this is normal. Let the microwave operate in the grill mode for a minute, then turn off and open. It is likely that the heating coils (heating elements) will turn red, and if they do not turn red, then at least they will be hot. Just don't try it with your bare hands! There is a high chance of getting burned. You can check the temperature of the heaters through kitchen mittens, or a towel.
You no longer need to check the combined mode - both the microwave and the grill are working properly, so there is no doubt about the operation of the combined mode.
If your oven has a convection mode, then you need to check it too. To do this, simply turn on the mode and see if it provides a temperature of 250 degrees (it will be visible on the scoreboard). If you are using the mode for the first time, smoke may appear. This is completely normal and should not be feared. The second time you turn on the smoke should be gone.
We will share with you another reliable method for checking the health of the microwave: we will find out if the microwave rays really do not go beyond the limits of your microwave, or if it is faulty and needs to be replaced urgently. To do this, we need: a microwave oven, two charged mobile phones. To begin with, let's take two mobile phones: we will “send” one of them to the switched off microwave oven, and we will pick up the other one. Let's close the microwave door well and proceed to the test: call your phone lying in the microwave. Normally, “the subscriber will be out of range” or “unavailable”. If you hear your usual ringtone, then the microwave clearly emits radiation outside the case.
And in order not to put your health at risk, we would advise you to replace the microwave oven with a double boiler or convection oven. Yes, not so convenient and practical, not so fast. But! First of all, it is safe for your health and the health of your family. Take care of yourself, because you deserve it!
Due to exposure to high levels of microwave radiation, health problems may occur, including cataracts and burns. And while leaks are often small enough to cause serious health problems, it's best to be safe and have your microwave checked - especially microwaves that are damaged or older than nine years old. You can even check your microwave for leaks at home.
Steps
Direct leak detection
- The strength of microwaves decreases significantly with distance. You can test at a distance that you would normally stand at the microwave when it is on (for example, at the kitchen counter).
- If the microwave stops working before you finish checking it, change the glass of water and run the oven for another minute.
-
Look at the reaction. If there is a leak in the microwave oven, then Fluorescent Lamp will glow, and the neon lamp will become a little brighter. Special electronic microwave testers may respond differently. If the tester shows a value of about 5 mV/cm2 at a distance of 5 cm, then you have cause for concern. All methods described here are fast household methods check the microwave for leaks. And even if the test gave a positive result (the presence of a leak), this does not mean at all that the microwave oven is dangerous, however, you should get it better checked (perhaps by taking it to a specialist).
Find a light bulb that responds to microwave waves. Certain objects may respond to microwave frequencies:
Make it dark. If you are using a microwave test light, be aware that it gives off a very faint glow. Skip this step if you are using a dedicated microwave oven tester.
Place a glass of water in the microwave. Running an empty microwave oven exposes the magnetron (current source) to high levels of radiation, which can cause it to break down. If you put a small glass (about 275 ml) of water inside, you will reduce this risk and at the same time leave a large number of unabsorbed microwaves, through which it will be possible to check for leakage.
Turn on the microwave. Run it for one minute.
Slowly move the bulb around the microwave. Hold the bulb or tester at least 5 cm away from the surface of the microwave. Slowly move the light bulb or tester around the door, you should be moving the light bulb at a rate of about 2.5 cm per minute. Go all the way around the door, check the seals and especially the areas that look damaged.
Using a WiFi connection on a laptop
- The instructions below assume you will be using two computers, but WiFi phones can also be used if you know how to ping the other from one device.
-
Set WiFi to 2.4GHz. If you do not know how to change the frequency of your WiFi, then go to the router settings and find the information about the "802.11 mode" mode (usually located in the advanced settings):
- 802.11b or 802.11g means the network operates at 2.4 GHz. Proceed to the next step.
- 802.11a or 802.11ac means the network operates at 5 GHz. Some routers give you the option to switch to another standard. If your router does not have this option, then this microwave oven test is not for you.
- 802.11n can operate on any frequency. Find the desired mode and set the frequency to 2.4 GHz. If the router produces two WiFi networks, set only one to 2.4 GHz.
-
Unplug the microwave oven. To be safe, unplug the microwave from the outlet, not just unplug it. After all, when you put your computer in a microwave oven, you are unlikely to be happy if the microwave oven accidentally turns on (or someone turns it on accidentally).
Prepare your computer. Turn on the laptop and connect it to the WiFi network. Check the battery level and power saving settings so that the computer does not go to sleep while it is in the microwave.
Put your laptop in the microwave. Do not turn on the microwave! You are only testing to see if the microwave is blocking the WiFi signal.
Ping your computer from another device. Open Command Prompt (Windows) or Terminal (Mac). Type ping followed by a space followed by the computer's IP address. For example, ping 192.168.86.150 .
Wait for an answer. If you get a ping response, then the computer was able to successfully return a signal through the microwave door, which means there are leaks in the microwave. If the time to send packets has expired, it means that the microwave oven has blocked the return signal. However, this does not guarantee that there are no leaks in the oven (since the microwave oven emits more powerful waves during operation), but, in general, this is a good sign.
Find two devices with working WiFi. Some WiFi networks use roughly the same frequencies as microwave ovens (around 2.4 GHz), so microwave protection should also block WiFi waves. To test this, you'll need a laptop or netbook that fits completely inside the microwave oven, and a second device that can also be connected to your home WiFi network.
Leak fix
- high levels microwave radiation can cause skin burns. If you haven't noticed any symptoms but have stopped using the leaky microwave, you are most likely safe.
Check the microwave oven door. Often leaks in microwave ovens are due to worn or broken parts on the microwave oven door. If you find a leak, look out for these most common causes:
- If you have a very old microwave oven, it is best to dispose of it. If you donate or donate a microwave that has a leak, leave a note on it with information about the leak so that the people who receive it can decide how to proceed next - repair or recycle.
- Some sites recommend using mobile phone to check the microwave for leaks by putting it inside and ringing it. Please note that microwave protection is for 2.4 GHz microwaves and is not required to protect against other frequencies. The frequency levels on which mobile networks operate range from 800 to 1900 MHz, so you should not even expect a microwave oven to block such a signal.
Warnings
- Not turn on the microwave if there is a laptop inside.
- The methods in this article do not always work, and they cannot replace a specialist who, with the help of special devices determine the leak.
- Do not disassemble the microwave oven unless you are an expert. Microwave ovens contain magnetrons that are extremely high voltage(approximately 2,000 V and 0.5 Am), which could cause serious injury or even death.
With a working control scheme, troubleshooting should be carried out as follows:
1. Check the serviceability of the high-voltage transformer.
transformer transforms AC voltage networks in two voltages - the filament voltage and the anode voltage of the magnetron.
Disconnect the secondary windings of the transformer from the circuit and check their integrity. Connect the primary winding to the network. The transformer must remain cold when idling. Make sure that there is a glow voltage, which is about 3 ... 6 V, and an anode voltage (measured between the transformer body and a high-voltage terminal, which is a double-insulated terminal), which is - 1.5 - 3 kV. Be careful when measuring the anode voltage!!! Keep the high voltage terminal away from the oven body. If there is no anode voltage, make sure that the high-voltage fuse located on the high-voltage terminal of the transformer is in good condition. If the fuse is defective, replace it with a similar high voltage fuse.
2. Check the condition of the protection (2X062H) and rectifier (HVR-1X) diodes. The protective diode should not ring in both directions. The rectifier should ring in one direction at the limit of resistance measurement - 1MΩ. It is advisable to use an analog device (measurement limit kOhm * 100). Approximate resistance in the open state is about a megaohm.
3. Check for a short circuit on the high voltage capacitor both between the terminals and to the case. It is advisable to check with a megger (with a test voltage of 500-1000V)
3. After making sure that the transformer, diodes and capacitor are in good condition, check the integrity of the magnetron heater (connected to the terminals on the plastic insulator, it sounds like a short circuit) and the absence of a short circuit between the magnetron terminals and the case. Magnetrom is an electrovacuum microwave device made with a direct-heated cathode, i.e. the cathode is connected inside the housing with a heater. The anode is the body of the magnetron.
4. Repair the connections in the high voltage part of the oven. Turn on the oven. If there is no heating, make sure that all voltages are applied to the magnetron leads. Be careful, the anode voltage is life-threatening. The filament circuits are under anode voltage. The filament current is about 3 A. If all voltages are present, the magnetron is faulty.
Regards, Alexey.